Mushclient Protips
Several members have already made some great guides about different aspects of Mushclient. The first protip would, of course, be to read those. This is a collection of additional tips and tricks that may be of use. Some may even help folks using other clients.
Client Side Alias Output Options
Your alias can be sent to a number of different places, but you will mostly use “World” or “Execute”. Which should you choose? If you want your alias to always be dumped straight to the game without any additional processing, you should choose “World”. This option does not allow other aliases and the like to mangle with it on the way. If you may want to do additional processing, you should send to “Execute”. This option allows for other aliases and such to continue to work before the output gets to the game. Note that either option will behave exactly the same way with respect to Mud-side aliases.
Mud Side Aliases for Fun and Combat
There are ways to use triggers and add-ons to do many things in Aardwolf, but some things just aren’t to be automated. Combat is one such thing. This can lead to a mad dash across the keyboard trying to type cast 62 target to loose our magic missiles. The experienced folks will know that we can just type c instead of the whole word cast, but it’s still kind of a pain. The logical solution is to create an alias. Pick a letter that’s easy to type twice; let’s use ii for our example. Now, we could easily create an alias in Mushclient to replace ii with cast 62. That’s doable, but it creates a pain in that we have to go in and change it every time we get a new attack we like better. (Side note, it may be a good idea to have at least two of these aliases to different attacks, preferably to different damage types.) A better option is to use mud-side aliases. We start by typing alias ii cast 62, which creates the alias. Now, in combat, we only have to hit ii to unleash our fury. Once we get a better spell available (perhaps fireball?), we can update the alias on the fly by simply overwriting what we already have (type alias ii cast 45). To see what we’re using with our aliases, all we need to type is alias.
This is also useful if you want to be able to grab potions on the fly. Pick a different letter to double (because, again, we may be doing this in a hurry mid-combat). Instead of an alias to cast number, we will alias to quaff potion. Be careful to be precise so that you don’t try to quaff your rusty halberd. This allows you to start with a lower level pot and update the alias as you get the ability to use better ones (up to a level 60 healing pot). This can also be done with Black Lotus and Refresh pots, making you able to respond quickly, even mid-combat, to a changing battle scenario. The last thing you need is to be almost dead and having to look at your keyboard to type out the potion or skill you need.
The Number Pad is your Friend
Mushclient allows for pretty much complete customization of the number pad keys. Leave NumLock turned on. Many will be aware that 8,2,4, and 6 on the pad send the North, South, West, and East commands, respectively. 5 should be to look. Somewhat strange at first, but – goes up and + goes down. It can be handy to set up a key for spellup and another for who area to see who else might be in the area you are playing (who area is even more important if you go to a PK clan, although you may want to customize it to something that shows only enemy clan members). Zero is scan, and the dot key is score by default. You probably won’t use score very often, so it may not hurt to reassign that to something else. 1 is probably aliased to cons all, which is incredibly useful. The slash key defaults to showing your inventory, and the asterisk shows what you have equipped.
Mapping custom exits
Mushclient has a built in mapper that automagically adds rooms as you explore the mud. The S&D plugin makes use of that map when assisting you in running to a mob, whether for a quest, a campaign, or a global quest. The map is also used when you move to an area via xrt instead of rt. Just playing the game will build up a useful map. There are, however, some things that can make the map more useful.
- When you enter a new area (and aren’t limited for time, such as in a GQ), explore as many rooms as you reasonably can.
- Create an alias in Mushclient (sent to execute, not world) that sends mapper cexit %1 to use the first time you encounter any nonstandard exit. For example, if your alias is ce and the custom exit is enter crack, then you would use the command ce enter crack to teach the mapper how to go through. Note that you have to wait a couple of seconds after you get through the exit to let the mapper know where it leads. Blue text should pop on the screen and then you can continue as before. This way, the mapper can navigate through custom exits to get you where you need to go.
- If you don’t always have passdoor (or even if you do), you can create a similar alias so that the mapper knows to open doors for you to go through. In this case, you should set your alias to open %1;;%1 (%1 is whatever you enter after the alias). This way, if your alias was dw, you would enter dw e to register an exit with a closed door to the east. Again, you only need to do this once for the mapper to remember it. The mapper will then negotiate the door for you as you go about your bloody rampages.
- Published in Public, Public-Guides
Portals List
Greetings all! The list below is by no means a complete list of current portals in Aardwolf and it may not even be 100% Accurate. If you notice any missing or incorrect information please contact me so I can adjust the listings. The sorting is very simple, NameofPortal – AreaofPortal – Comments.
Level 1 Portals
Amulet of Aardwolf – Aardwolf Hotel – 750 QP Aarditem
Aylorian Academy Portal – Aylorian Academy – Goal
Level 5 Portals
A Garbage Can – Grand City of Aylor – AQ, Level-Capped(10)
Aura of the Sage – The Call of Heroes – Goal
Level 10 Portals
Wizard’s Prism – All in a Fayke Day – AQ
Golden Pet Collar – Giant’s Pet Store – Goal/AQ
An Apple Press – Land of Legend – Goal/AQ
Level 15 Portals
A Wooden Yoke – AQ (Random Chance)
Honeycomb – War of the Wizards – Rare Drop off of bees, Level-Capped(30)
Yelsem’s (:*Freedom*:) – Labyrinth – Goal, Rare, Same as Wooden Yoke
Level 20 Portals
Queen Angelina’s Locket – Diamond Soul Revelation – AQ, Limited Use
Level 25 Portals
Amulet of the Planes – Lower/Upper Planes – Drop
Level 30 Portals
A Two-Way Mirror – Imperial City of Reme – Store Bought
Level 40 Portals
A Cracked Wooble-Nut – The Wobbly Woes of Woobleville – Goal/AQ
Level 42 Portals
A Train Ticket – Gold Rush – Store Bought
Level 50 Portals
A Majestic Orb – Flying Citadel – Goal/AQ
Level 60 Portals
Goblin Warplans – Goblin Fortress – AQ
A Trip To The Killing Fields – Killing Fields – AQ
A Heliodor Shard – Ruins of Diamond Reach – Goal
The Sigil of Illoria – Tournament of Illoria – Goal/AQ
Irresistible Calling – Empire of Talsa – AQ/Drop
Passport to Knossos – Great City of Knossos – Goal/AQ
Level 70 Portals
A Mirror Showing Deneria’s Past – Deneria – Goal
Level 75 Portals
Enchanted Dreams – Dark Elf Stronghold – AQ (Part of Goal)
Level 80 Portals
<-L-> Lifetime Pass to the Gladiators Arena <-L-> – Gladiator’s Arena – Goal/AQ
Time Capsule – Island of Lost Time – Goal
Enchanted Spellbook – Snuckles Village – Goal/AQ (Random Chance)
Passage to Gwillimberry – The Trouble with Gwillimberry -Goal
Level 85 Portals
A Cedria – Insanitaria – Goal
Black Volcanic Glass – Pompeii – AQ
The Orb of the Stars – Darklight – Goal/AQ
A Dark Crystal – Imperial Nation – Drop
Jenny’s Magical Pendant – Yourgach Domain – Drop
Level 90 Portals
Strange Glowing Disc – Sanguine Tavern – Drop
Level 95 Portals
A Cautionary Tale of the Marsh – Marshlands of Agroth – Goal
Level 100 Portals
Cowlina’s Trust – Cougarian Queendom – AQ/Needed for Goal
Evil Intentions – Empire of Talsa – AQ/Part of Goal
A [House] of Cards – House of Cards – AQ
A [Trump] of Benedict – House of Cards – Different Landing then Cards
A Masquerade Mask – Masquerade Island – Goal
A Storm Ship in a Bottle – Storm Ships of Lem-Dagor – AQ
A Gold Plated Silhouette Brooch – Prosper’s Island – AQ
A Share Ownership of Hotel Royal – Prosper’s Island – Goal
An Envelope of Xyl – Xyl’s Mosiac – Goal
Queen Melosa’s Mirror – Amazon Nation – AQ/Drop
An Amulet of Dragon Warding – Broken Halls of Horath – Drop (Random Chance off of Aiwiss, possibly level locked)
A Crystal Ball – Realm of the Firebird – Drop
A Passage to Gwillimberry – The Trouble with Gwillimberry – AQ
A Ring of Pale Mushrooms – Tir Na Og – Drop from sylphs in the entrance maze
Level 105 Portals
A Chip of Willow Bark – Marshlands of Agroth – AQ
Level 110 Portals
A Medallion of Daemon Summoning – Dark Temple of Zyian – Drop
Level 120 Portals
Hatshepsut’s Cartouche – Eighteenth Dynasty – Drop
Sir Lauren’s Despair – Gilda and the Dragon – Goal
Sir Lauren’s Mild Disappointment – Gilda and the Dragon – Goal, Limited Uses
The Holy Well – Verdure Estates – AQ
Level 121 Portals
The Lemniscate – Archipelago of Entropy – AQ
Level 130 Portals
Black Darkness of the Citadel – The Blood Opal of Rauko’ra – Goal
Icy Portal of Gvozd – Helegear Sea – Drop, Limited Uses
The Badge of the Draconic Intelligence Service – Unearthly Bonds – Goal
The Gate Rune – Desert Prison – AQ/Drop
Level 132 Portals
Backstage Pass – Drageran Empire – AQ (Part of Goal)
Level 140 Portals
Broken Curse – Dread Tower – AQ
The Sea King’s Portal – Sea King’s Dominion – Goal(FT2), Random Chances, Very Complicated!
A Denali’s Teleport Device – Empire of Aighialla – AQ
The Horn of the Ancestors – Mount duNoir – Drop
A Magic Banana – Nanjiki Ruins – Goal
Level 141 Portals
Desert Doom – Desert Doom – Goal
Level 142 Portals
Royal Audience – Drageran Empire – AQ
Level 147 Portals
The Laurels of the Victor – Cataclysm – Goal
Level 150 Portals
Permanent Peace – Battlefield of Adaldar – Goal
Cosmic Calling – Empire of Talsa – AQ(Part of Goal)
A Dolphin Figurine – Arisian Realm – Goal
Aethelswyth’s Visions – The Witches of Omen Tor – AQ(Part of Goal)
A Copy of the ((Map of the World)) – The Glamdursil – Drop
Bell Tent – Sagewood Grove – AQ
A Demon School Handbook – School of Horror – Drop – In locker in room 30751 upstairs
Level 160 Portals
A Black Pendant – Black Lagoon – Goal/AQ
The Timeless Seal of the Ages – Deadlights – AQ
The Dark Orb of the Vampires – Keep of Kearvek – Goal/AQ
Level 170 Portals
Map of the Woods – Eternal Autumn – Goal/AQ? , Once Per Tier? More info needed
Starburst – Tree of Life – AQ
Level 180 Portals
The Partroxis – The Partroxis – AQ
The Tiger of Kai – Takeda’s Warcamp – Drop
Compendium of Fal’Shara – Artificer’s Mayhem – AQ/Drop
Level 185 Portals
A Small Crystal Tree – Yggdrasil: The World Tree – Goal/AQ
Level 190 Portals
A Golden Obol – Entrance to Hades – Goal/AQ
A Jewelry Box – School of Horror – Drop
A Crown of Swords – The Trouble with Gwillimberry – AQ
Level 200 Portals
A Dreary Hole of Despair – Curse of the Midnight Fens – Drop(Random Chance)
-=Oradrin’s Call=- – Oradrin’s Chosen – Epic
A Red Beacon – Journey to the Inferno – Epic
->Ice Bomb Rocket>> – Icefall – Epic
Level 201 Portals
Hot Wok of Qong – Qong – Goal/AQ, Random Chances?
-(a fragment of the Great Rift)- – Titan’s Keep – Epic
- Published in Public, Public-Guides
Remort Guide
TLDR; Below are the suggested, remort progressions for a new, Tier 0 character.
| Primary | Remort 1 | Remort 2 | Remort 3 | Remorts 4-6 |
|---|---|---|---|---|
| Paladin | Psionicist | Cleric | Mage | Your Choice |
| Ranger | Psionicist | Cleric | Mage | |
| Thief | Psionicist | Cleric | Mage | |
| Warrior | Psionicist | Cleric | Mage | |
| Cleric | Warrior | Psionicist | Mage | |
| Mage | Warrior | Psionicist | Cleric | |
| Psionicist | Warrior | Cleric | Mage |
Note: The aforementioned suggestions are tailored for new characters during their first tier.
PHILOSOPHY
The progressions were chosen to maximize the versatility of your character. Rounding out primary casters v. melee requires different paths and serves to increase damage dealt and defenses. For casters, it will add the ability to deal some damage with weapons. For melee classes, it will add defensive spells. (Guide By Zhalut)
- Published in Public, Public-Guides
Setting Up Your SH Stats For Pupping
Setting Up Your SH Stats For Pupping In The Future
Now that SH stats save over remorts your going to want to invest your trains properly from the start to get the most from pupping in the future . This guide should help you get a decent setup. Remember to treat this as a guide and in no way is it required to follow it.
Except for your first remort (wich is free always take the freebie you need those qps!!) always super hero loud. For the extra 200 qp you will get 200 free trains (thats 1400 extra trains per tier) 15 minutes of double for the mud and announcing that you plan to go loud on wang at 186 will make it much easier for you to find a drag for those last levels.
Ok you are a SH now. How should your stats be set up?
First start by training your primary stat to 171 and str to 171 I will get more into this later in the guide. But the basic goal here is to make sure when you eventually decide to pup you arent to weak and can maintain a decent kill speed.
Second raise your non primary stats to 131. Why so low you ask? Well we are going to get to that.
Third start dumping all the rest of your trains into Luck every time you remort. This is going to be the first stat you want to max when you decide to start pupping. Keep in mind the highest you want to raise any stat is 395 (you get 5 free bonus stats in all stat categories when you are R7 so 395 actually equals 400). Help maxstats is also good to read.
Here is an example of how you would want your stats set up as a Mage/Psi.
Str: 171 Int: 171 Wis: 131 Con: 131 Dex: 131
Luck: As Much As Possible
Here is an example of how you would want them set up for a War/Thief.
Str: 171 Dex: 171 Con: 131 Wis: 131 Int: 131
Luck: As Much As Possible
Here is why. Luck affects recieving bonus trains and bonus stats when you pup. The higher the luck the better the chance that you will recieve these. Once a stat hits 200 you will no longer recieve free stats for it. IE if you have 200 str you will never recieve a bonus Str stat when you gain a pup. So while your pupping to max your luck you will be getting free bonus stats in all your stat slots. This adds a TON of free training while you pup. More then likely by the time you max your luck your 171 stats will have reached 200 on their own and your other stats will have raised decently as well. Then when you max your luck and move onto maxxing your primary stats.
When you decided to start pupping doing so in a group will greatly increase your pupping speed.
Guide by Wars
- Published in Public, Public-Guides
OPK FAQ
PHILOSOPHY
The goal is to maximize time spent leveling, campaigning, and exploring Aardwolf without getting frustrated by overpowered players killing you in an unfair fight.
OVERVIEW
(more…)
- Published in Public, Public-Guides
Tempering & Ores

Black Ore (Silver Ore from Reme)
Fossilized Bone Ore from Gnoll’s Quarry
Special note:
All tempering information shown in this section is the result of a T9 character with maxed tempering stats (600 con, dex & luck). The results of a temper depends of the stats of the blacksmith, the % practiced in tempering, and the level of the weapon being tempered. Unless you have max tempering stats, your results will not be the same as those shown here. This includes any stats added as well as the duration of the temper itself. The timer on tempers will only count down while you are logged in to Aardwolf. Once you log out, the temper timer halts and will only resume the countdown upon login.
When tempering your own ‘owned’ weapons, or any unowned weapons, there is no recovery period. However, when tempering the ‘owned’ weapon of another player, there is a 10 minute cooldown.
Tempering
A skilled blacksmith can use raw materials and a forge (such as the one in Aylor- ‘runto forge’) to temporarily increase the abilities of weapons.
Unlike most skills/spells, the limitations and results of tempering are not based solely upon stats or level. Instead, the following are used:
* The blacksmith’s combined strength and dexterity must be at least double the combined hitroll and damroll of the target weapon if it is owned by the blacksmith, or quadruple this total if it is owned by someone else.
* The weapon must be made of a metal material (see ‘help materials’), and must be done at a forge (like the one in Aylor- ‘runto forge’). Quest weapons are considered metal material for this skill, even if not listed. Arrows can also always be tempered regardless of their base material.
* Ore (items of type ‘raw material ore’) must be used when tempering. The quality of the ore will determine the maximum hitroll/damroll added. High-grade ores with high-stat weapons may add additional effects. Basic low- and high-grade ores are available at the Aylor forge, but several other types may be found throughout Andolor.
Unlike similar modification skills (e.g., sharpen), tempering will never damage or destroy the target weapon. The duration of the tempering effect is based upon the blacksmith’s strength and dexterity.
A (T) or (Tempered) flag will show on weapons that have had the skill used upon them, depending on the user’s ‘shortflags’ settings.
Skill available only to the Blacksmith Warrior Subclass.
Primary Stat: Strength, Dexterity
Affected By : Luck
Basis Ores
Ores are found in a variety of areas within Aardwolf and are usually mob drops.
Two basic ores are sold at the blacksmith shop in Aylor:
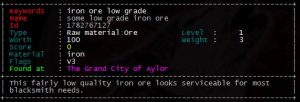
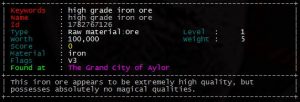
Tempering a level 90 dagger with low grade ore adds 15 average damage to your weapon and tempering a level 91 sword with high grade ore adds 27 average damage to your weapon. Both tempers last for 8 hours and 40 minutes of online game time.


Tempering a level 201 dagger with low grade ore returned the same results as the level 90 dagger, however, tempering a level 201 sword with the high grade ore added 40 average damage to the weapon. The duration of the temper didn’t change, though.

Black Ore (Silver Ore from Reme)
One of the really easy to get ores is found in the Imperial city of Reme.
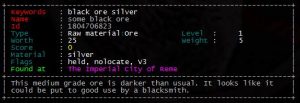
Silver ore is found inside the mine cart in the mines of Reme. You do need to kill the wounded legionaire for the silver key to unlock the door to the mines.
Runto reme
Run 4e3n
Kill a mortally wounded legionnaire.
You get a heavy silver key from the hammered corpse of a mortally wounded legionnaire.
type : keyring put all (This is handy to do if you plan on going back to get more ore, so you don’t have to kill the legionnaire again.)
Move one north and open the door down with the key you just got. Passdoor will not work on this door.
Run 2d1n
There may be aggro mobs in this section, so be careful.
This is the object with the ore : A large iron ore car is here, filled with black ore.
type : rget silver mine (if you have an item in your inventory with the keyword mine, then rget will target the object in the room instead)
You get some black ore from a large iron ore car.
You only get one black ore (keyword silver) per repop.
| Black ore (Silver) | Level 1 | Level 26 | Level 30 | Level 80 | Level 100 | Level 120 | Level 200 | Level 271 |
| Average Damage | 5 | 9 | 9 | 25 | 25 | 25 | 25 | 25 |
| Hit Points | 20 | 33 | 35 | 60 | 70 | 80 | 120 | 155 |
| Duration | 7 hours | 40 minutes |
The information on this table is from a blacksmith with max stats at level 201, using the silver ore on weapons at 8 different levels,
showing the bonuses added to those weapons.
Fossilized Bone Ore – Gnoll’s Quarry
Bone ore is only obtainable after you have completed the Gnoll’s Quarry goal. Many players have already completed this goal and some are willing to auction bone ore if you ask.
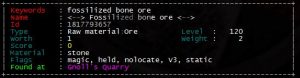
Once you have completed the goal, it is very easy to access the special section of the area where it can be found. However, it is a random drop from the fossil mobs in there and you can go a few repops before one of the mobs drops one ore for you. Sometimes you can get 2 or 3 ores in the one repop. Patience is the key for collecting these ores.
Also note that you cannot recall nor home out from the rooms in this section, but must enter a portal. Alternatively you can exit through the custom exit back to the main section.
Runto quarry
Run 2swn
type : enter cave
move one room west
This now puts you in the section, which consists of 5 rooms, where you can kill the mobs for the bone ore. Make sure you keep the ore as you find it so that you don’t accidentally sell it.
| Bone Ore | Level 1 | Level 6 | Level 11 | Level 26 | Level 31 | Level 40 | Level 50 | Level 60 | Level 80 |
| Average Damage | 7 – 9 | 10 | 12 | 12 | 15 – 19 | 12 – 15 | 19 – 20 | 22 – 25 | 22 – 33 |
| Hit roll / Damage roll |
3 | 3 | 3 | 4 | 4 | 3 – 5 | 5 | 6 | 7 |
| Random stats | 7 – 11 | 4 | 4 | 12 | 3 – 11 | 4 – 10 | 6 – 9 | 3 – 13 | 2 – 16 |
Duration : 6 Days 9 Hours.
| Bone Ore | Level 90 | Level 100 | Level 110 | Level 120 | Level 130 | Level 140 | Level 150 | Level 160 | Level 170 |
| Average Damage | 32 | 34 – 38 | 34 – 37 | 31 – 40 | 36 – 39 | 36 – 39 | 40 | 37 – 43 | 39 – 41 |
| Hit roll / Damage roll |
7 | 8 | 8 | 9 | 9 | 10 – 11 | 10 | 11 | 11 |
| Random stats | 8 | 2 – 11 | 8 – 15 | 2 – 15 | 2 – 14 | 4 – 14 | 18 | 5 – 21 | 5 – 10 |
Duration : 6 Days 9 Hours.
| Bone Ore | Level 180 | Level 190 | Level 200 | Level 211 | Level 221 | Level 231 | Level 241 | Level 250 | Level 261 |
| Average Damage | 39 – 47 | 42 | 43 – 50 | 43 – 48 | 45 – 48 | 46 – 53 | 47 – 54 | 48 – 52 | 52 – 53 |
| Hit roll / Damage roll |
12 | 12 | 13 | 13 | 14 | 14 | 15 | 15 | 16 |
| Random stats | 4 – 20 | 17 | 2 – 17 | 2 – 21 | 5 – 14 | 3 – 15 | 4 – 12 | 3 – 15 | 5 – 17 |
Duration : 6 Days 9 Hours.
| Bone Ore | Level 271 | Level 281 | Level 291 |
| Average Damage | 50 – 53 | 52 – 54 | 50 – 54 |
| Hit roll / Damage roll |
16 | 17 | 17 |
| Random stats | 2 – 15 | 3 – 12 | 2 – 16 |
Duration : 6 Days 9 Hours.
The random stats are exactly that. The temper may add luck 3 times to your weapon, or it may add dex twice and con twice, or it may add 4 different stats. How much is added in each stat assigned is also random and never repeats.Think of it like a lucky dip.
If you are after a particular stat added to your weapons, it would be better to use an ore that will add that stat. There are a few of them around.
- Published in Public, Public-Guides
Sitting 101 – How to Pup, Train, and best choices!
Hey guys, name’s Xaeris. I’ve been around the mud since V1, very early during inception. I’ve been around the block and I’m a traditional number cruncher and min/max’er. So, now to the body of things: You’ve hit 201. You’re 7x. What do you do now?!?
Step 1 – Stats.
Your first tier, you’re probably going to hit SH with about 600-700 stats. Maybe more. This means that you have quite a bit of work to do. You can have a total of 1725 stats at T0, with an additional 25 stats every tier. This means at t9 you’ll be able to have 1950 stats. What does this mean? You should know by now that stats do the bulk of the heavy lifting of being a character on Aard. Before we get to maxxing stats, we want to quickly review what each stat does:
- Strength – This gives you Damroll (DR). It also improves carrying capacity.
- Dexterity – This gives you Hitroll (HR). It also impacts Dodge (your primary avoidance of attacks).
- Intelligence – Affects a large selection of spells (Mage and Psi mostly). Increases effectiveness of practices
- Wisdom – Affects a large selection of spells (Paladin and Cleric mostly). Increases the practices gained (Not relevant at 201!). Also impacts damage reduction of Sanctuary, both through the spell and the Aura
- Constitution – Affects the HP gained at levels (Not relevant anymore). Reduces the amount of physical damage you take.
- Luck – Fun! Does all the things. Bonus stats, increased proc rates, bonus stats via spellups, bonus stats via powerup’ing (Puping).
Now, the max stat at 201 is 600 (including spells and gear). Gear and spells are limited to 200 + 5 for a class bonus, and 200+10 for your pclass stat. For eg – PPsi has a max of 205 to all stats and 210 for Int. This means you want to train your stats that you want to max to 395/390.
How to determine what stats you want
Regardless of your class, you will want Luck. Luck at 600 stats gives a +6 bonus qp when you complete a quest. It’s not 100% triggered, but when it does, that’s really helpful. So then it becomes a combination of the other stats. A good baseline is found below:
Cleric – Wis, Luck and Con. This helps make you tankier, able to soak damage and do decent output on your damage. The rest can be spread but a decent Str and Dex allow you to supplement spellcasting with good weapon damage. Int can be a dumpstat here, but if you’re looking to do any dispelling (mobs, players in PK), Int is critical
Psi – Int, Wis and Con. Int and Wis maximize your spells, (You can actually get away with 350 wis, but I prefer 395 to do enchanting – See Below). Str is a dumpstat if you’re Psi as a Navigator (great for first time 201’s to avoid certain areas).
Warrior – Str, Con and Dex. Gotta land those hits, and gotta soak. Int is your dumpstat.
Thief – Str, Dex and Con. Same thing above, don’t want to die. Int is again a dumpstat.
Ranger – Int, Wis and Con. Maximize spelldamage, survive more.
Mage – Int, Str and Con. All the spelldamage. Dex and Str are less important, but help with damage output.
Paladin – All the stats. Sadly, Paladin best performs with high Str, Dex, Int, Wis and Con. Luck is hard to dump as a stat.
The best way to build, is look at these suggestions, and look at what your math would be. Say you’re a PThief, and you want to max Str, Dex and Luck to start. This means 390+395+395 = 1180, so you have 545 to assign to the other stats. I’d recommend a 200 Wis and Con, leaving you with 145 int. You can play with these (consider a free rebuild after you’ve maxxed stats). Potential (a high qp investment, not recommended until you have Aard gear and Wishes out the wazoo) will help with this, but is not recommended for low tiers.
Step 2 – Gear
You’re now 201, what do you do? You need gear. Eqsearch is your friend. Watch the market for cheap 201 gear. This will be updated at some point (We can start compiling good items).
What are you looking for in gear? You will want to max stats first, so ensuring you’re getting 200 from your gears + spells (You can check via the Stats command). Once there, you want to look for Damroll and Hitroll. Hitroll is only good until 1200, where it’s soft capped (You can function with a lot less but 1200 is needed for any 201 PK). Damroll just increases your melee weapon damage.
Buy yourself a 201 Aard aura, Breastplate, Gloves, Bracers and weapons. These have some of the best DR/HR options and best damage at 201. 201 weapons also are really good to tpenchant (Spend tp to increase the hr/dr of the weapon to 1/2 the weapon’s level – so a 201 can have 100 HR/DR before enchants). NOTE: DO NOT ENCHANT YOUR 201 WEAPONS BEFORE FINISHING WITH TPENCHANTING. I cannot stress this enough. If one of HR/DR goes over 100, you cannot get it. Ie, you enchant your weapon with +6 dr. Now you tpenchant, you’ll be capped at 100dr/94hr. This is bad.
Step 3: Where and How to Pup
Step 4: Epics
Step 5: Enchanting
- Published in Public, Public-Guides
Guide to Customized Prompts

Hey everyone, simple little guide here to explain how to make your own customized prompts.
There are two different custom prompt strings you can set on Aardwolf, a prompt and a battle prompt.
Battle prompt is displayed while you’re in combat with something, and regular prompt is displayed the rest of the time.
Battle prompts usually contain the health status of your current target.
There are 2 commands used to set prompts:
prompt and bprompt
These are my current custom prompt strings. (you can copy/paste them directly into the game to use them, modify them, or create your own entirely from scratch to your own liking)
prompt @c[@W%h/%H@whp@w @W%m/%M@wmn @W%v/%V@wmv @W%q@wqt @W%X@wtnl@c]@w%d>%c

bprompt @c[@W%h/%H@whp @W%m/%M@wmn @W%v/%V@wmv @W%X@wtnl@R%b@c]@w%d>%c
If this looks overwhelming, it’s because I had added subtle color codes to the entire thing to make it more visually appealing to me, if you are going to build your own prompt, I suggest starting without the color, get it how you like, and then add the colors. (Otherwise it can be quite confusing!)
Here is what these look like in the game.
Prompt:
![]()
Battle Prompt:
![]()
Let’s break it down and simplify it without the color codes, so you can see how to build your own prompt string.
prompt [%h/%Hhp %m/%Mmn %v/%Vmv %qqt %Xtnl]%d>%c

bprompt [%h/%Hhp %m/%Mmn %v/%Vmv %Xtnl%b]%d>%c
You can see that each variable is represented by a %code. I will mention just a few of them here.
%h = current hp, %H = max HP and so on.
%d will display Dbl: xx showing how many minutes of double experience are remaining if double is currently running.
%b is only useful in the battle prompt (bprompt) as it will show Enemy: xx% to let you know your current combat target’s health
You can see a full list of all the prompt variables and options by typing: help prompt
- Published in Public, Public-Guides
Instinct, Mastery and Potential
What is Instinct, Mastery and Potential and when should I train them? We’ve all asked ourselves and others these questions, so here is a summary of what they are, what they affect and what they cost, as well as other information you might want to know about them.
The first thing to know is that there are three help files on all thee that go into a lot of detail on this. This guide isn’t designed to replace them, just to give you a basic understanding of all three.
| Instinct | Mastery | Potential | |
| Cost: | Gold and trains; Cost starts at 200 trains and 2,000,000 gold. Maximum Instinct per skill is 200. | QP and gold; Cost starts at 100 QP and 2 million gold. | QP; Costs start at 100 QP |
| Affects: | Increases the proficiency (%) of the skill or spell. It will increase the % for spells that are at 100% including when equipment sets it too 100%, but the increase over 100% is not a direct %. | Each mastery point will increase the damage for that damage type. Each point is not a %. For example, a 10% increase is 38 pts., and 20% will need 104 pts. | The math for how much of an increase of your max stats is: (Potential/6 and rounded up). It will not go above the absolute max of 400 per stat and 2400 total. |
| Preserved across tiers and remorts? | Yes | Yes | Yes |
| Can rebuild spent points? | Yes – Instinct Rebuild. The rebuild cost is 2% of the gold and trains, with a max cost of 5000 trains and 50M gold. | Yes – Mastery Rebuild. The rebuild cost is 2% of the gold and QP to a max of 4k QP and 50M gold. | N o |
| Notes: | Instinct will only work on skills you can use, it will not let you use a skill you don’t have. |
- Published in Public, Public-Guides
Enchanting your Aardwolf items
Enchanting your Aardwolf items
Guide by: Pwar (many thanks to Kya for information!)
So you’ve saved up all those QPs and bought some nice Aardwolf items.. What can you do to make them even better?
*** Important: Aardwolf weapons can also be enchanted, but I do not recommend until later because of the costs associated.
Example: If you had a level 40 Dagger of Aardwolf you can tpenchant it up to +20 DR, but if you have already
solidify enchanted it, you may only be able to tpenchant to +14, where if you tpenchant it first to +20 then add solidify,
you could potentially reach +26 DR
For the reasons in the example if you’re going to enchant a weapon, make sure you tpenchant it fully before doing so if you want to take full advantage of the weapon’s potential.
Now that we have that out of the way. This guide is mainly for enhancing other Aardwolf items and Aura of Trivia.
There are 3 enchantments we are concerned with here:
Solidify – Makes invis item visible and adds 0-6 HR or DR (one or the other, 6 DR is generally considered ideal)
Resonate – Makes an item hum and adds 0-3 Luk (0-2 of a random stat as bonus if lucky)
Illuminate – Makes an item glow and adds 0-4 Wis (can add same amount of Luk if lucky)
In order to use these enchants the item must be invisible, not humming, and not glowing if you want to do all of the enchants.
Aardwolf items come by default as visible, glowing, and humming so we need to change these.
This costs 2 TP to toggle all 3 flags at once and is done at Ivar’s Item Remodeling in Aylor. (They can be toggled individually but would cost 2 TP each using that method.)
Head to Ivar’s Item Remodeling by using: runto remodel
You adjust the flags on your item with: setflag item glow hum invis
*** Important: Be very specific on item name here you don’t want to do it to the wrong item!
EXAMPLE:
setflag breastplate glow hum invis
Turning OFF flag: glow
Turning OFF flag: hum
Turning ON flag: invisA strange psionicist charges you 2 trivia points for her services.
Flags on breastplate before: unique, glow, hum, magic, held, burn-proof, V3, precious
Flags on breastplate after (ready for enchanting): unique, invis, magic, held, burn-proof, V3, precious
You can see we have now removed glow and hum, and added the invis flag to the item.
Now your item is ready for enchanting by a capable and proficient enchanter.
Look for someone who is primary class Enchanter with max stats ideally. If you
watch the gossip channel Dexx is often offering free enchanting services for items.
What happens if you get less than an ideal enchant on your item? Well if your
enchanter is a primary class enchanter, they are using enchanters focus spell
which will allow them to have another try at enchanting it with better stats.
If your item is still not to your liking, you can disenchant (help disenchant)
to remove one of the enchants at a cost of 3TP so you could try again.
- Published in Public, Public-Guides